How to Right-Size Packaging for E-Commerce
Shipping oversized boxes is costing you more than you think. On average, 40% of e-commerce package space goes unused, leading to higher costs due to dimensional (DIM) weight fees. For example, a 3-lb product in an oversized box may be billed as 11 lbs, adding $5+ per shipment. Multiply that by 100 daily shipments, and you’re looking at $127,500 in unnecessary annual expenses.
Right-sizing your packaging - choosing box dimensions that match your product’s size - can cut shipping costs by 15%-30%, reduce material use by 26%, and improve customer satisfaction. Smaller boxes mean fewer surcharges, less void fill, and better protection for your products. Plus, 72% of consumers say packaging influences their purchase decisions, so getting it right directly impacts your brand’s reputation.
Key Takeaways:
- Avoid DIM weight fees by using properly sized boxes.
- FedEx and UPS impose extra fees for packages over 10,368 cubic inches (handling surcharge) or 17,280 cubic inches (oversize classification).
- Right-sizing reduces shipping costs, material waste, and product damage while improving customer experience.
This guide explains how to measure products, select the right box sizes, and use technology like box optimization software to save money and streamline your packaging process.
What Is Right-Sizing Packaging?
Definition and Core Concept
Right-sizing packaging is all about choosing box dimensions that closely match your product's actual size. It's not just about picking a smaller box - it’s a strategic process that considers the product's shape, fragility, and shipping method.
The main aim? Stop shipping "air." Imagine sending a 5-lb product in a box that's mostly empty space - you’re paying extra for that unused room. Right-sizing uses SKU measurements, warehouse cartonization software, or even on-demand box-making tools to ensure the packaging fits just right.
Here’s a startling fact: about 50% of e-commerce parcels are improperly sized for their contents. This means half of all shipments are costing more in materials and shipping fees than they need to.
But it's not just about saving money. Right-sizing also boosts product safety and enhances the customer experience.
Main Benefits for E-Commerce
Right-sizing offers a range of benefits for online retailers:
- Lower shipping costs: This is the most immediate advantage. By optimizing packaging to lower dimensional weight (DIM) fees, businesses can significantly cut shipping expenses. Plus, you avoid costly surcharges. For instance, FedEx imposes an Additional Handling fee for packages over 10,368 cubic inches, while both FedEx and UPS classify anything exceeding 17,280 cubic inches as Oversize.
- Less product damage: Properly sized packaging keeps products snug and secure, reducing the risk of damage during transit. This translates to fewer returns and reshipments. And considering that returns make up 20% to 25% of all e-commerce shipments, this is a big deal.
- Improved customer experience: Thoughtful packaging enhances the unboxing process and reflects positively on your brand. Oversized boxes stuffed with filler can frustrate customers and give off a careless impression - especially to those who value sustainability.
- Reduced environmental impact: Smaller boxes mean less material waste, less filler like bubble wrap, and more efficient truckloads. This not only lowers your carbon footprint but also reduces the amount of waste customers need to handle.
| Benefit | Impact |
|---|---|
| Shipping Costs | Reduces DIM weight charges and avoids surcharges |
| Product Safety | Minimizes shifting, preventing damage during transit |
| Sustainability | Reduces material waste and increases truckload efficiency |
| Customer Experience | Enhances unboxing and reduces disposal hassle |
sbb-itb-ed0a9d1
The Power of Right-Sized Packaging (ft. Cameron Stout) | LeaderShipping
For more expert advice on fulfillment, explore our resources and guides.
Step-by-Step Guide to Right-Sizing Your Packaging
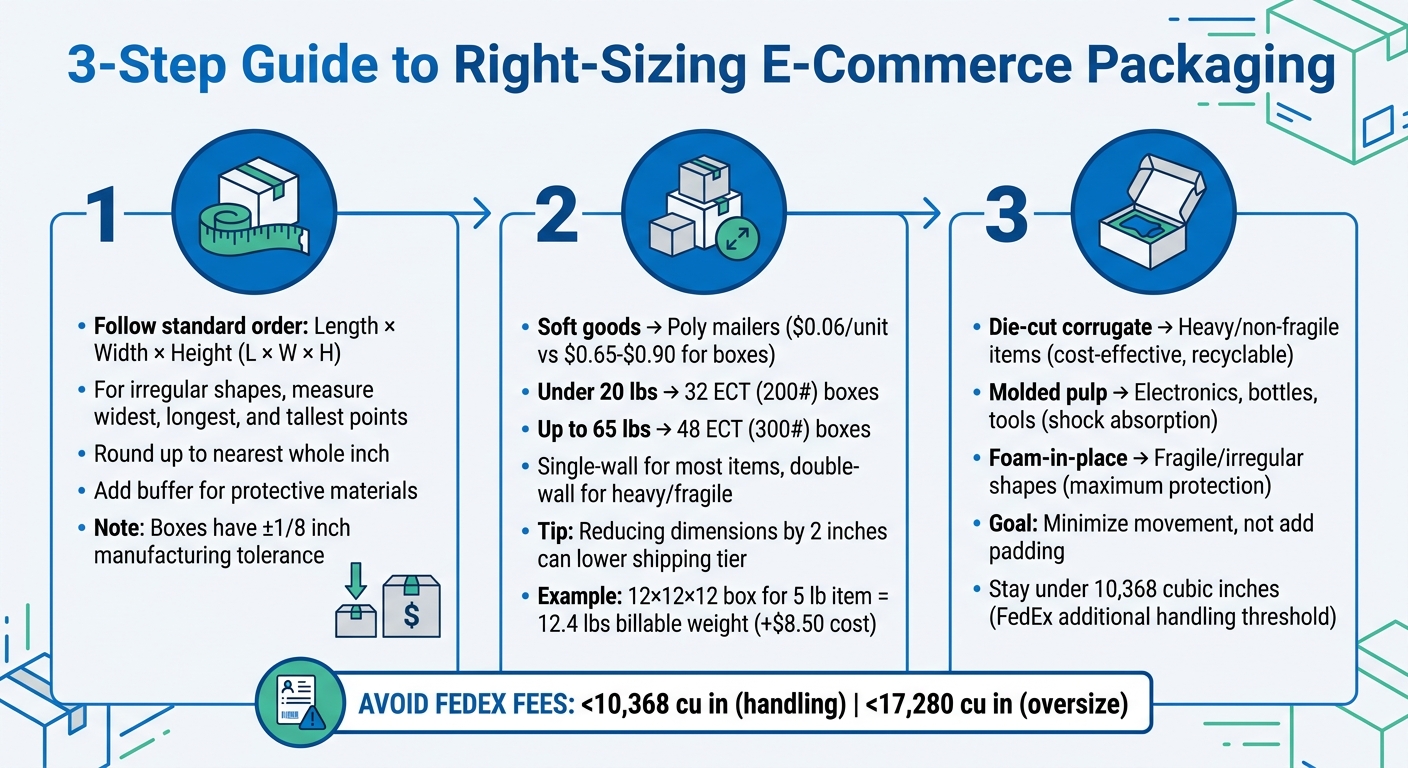
3-Step Guide to Right-Sizing E-Commerce Packaging
Step 1: Measure Your Products
Start by carefully measuring your product's dimensions before choosing a box. Always follow the standard order: Length x Width x Height (L x W x H). Length is the longest side, width is the next longest, and height is the vertical dimension from base to top.
For irregularly shaped items like vases, toys, or bundled products, measure the widest, longest, and tallest points to account for the "outer envelope". If you're dealing with multiple oddly shaped items, you can group them into a more uniform shape to simplify measurements and ensure a better fit.
Round up your measurements to the nearest whole inch to avoid issues like shipping surcharges or improper fit. Don’t forget to add a small buffer for protective materials like tissue paper, bubble wrap, or inserts - these can subtly increase the needed box size. Keep in mind that corrugated boxes might have a manufacturing tolerance of ±1/8 inch. Always measure on a flat, stable surface to ensure accuracy.
Once you’ve got the exact measurements, you’re ready to select the best box sizes and materials.
Step 2: Select Box Sizes and Materials
With precise measurements in hand, it’s time to pick your packaging. Not every product requires a box - soft goods like clothing work well in poly mailers, which cost as little as $0.06 per unit compared to $0.65–$0.90 for a medium-sized box. Poly mailers also reduce both weight and dimensional shipping charges.
For items that do need boxes, consider the product's weight. Use 32 ECT (200#) boxes for items under 20 lbs and 48 ECT (300#) boxes for items up to 65 lbs. Single-wall boxes are sufficient for most e-commerce shipments, but double-wall boxes are better for heavier or fragile goods.
Even small adjustments in box size can lead to savings. Reducing dimensions by just 2 inches might lower the package into a cheaper shipping tier. For example, using a 12×12×12 inch box for a 5 lb item can push the billable weight to 12.4 lbs, potentially adding $8.50 in shipping costs. Conducting a packaging audit for your top 20 SKUs can reveal where you’re shipping unnecessary "air". This not only cuts shipping fees but also streamlines operations.
Once you’ve chosen the right box and materials, the next step is optimizing the internal space to avoid using excessive void fill.
Step 3: Reduce Void Fill with Custom Inserts
Custom inserts are a great alternative to loose void fill, as they secure products in place.
The goal is to minimize movement, not to add extra padding.
Select your insert material based on the product’s needs. Die-cut corrugate is a cost-effective and recyclable option for heavier or non-fragile items. Molded pulp works well for items like electronics, bottles, and tools, offering excellent shock absorption. For fragile or irregularly shaped products, foam-in-place provides maximum protection by molding perfectly to the item’s shape.
When designing custom inserts, keep overall dimensions as small as possible to avoid exceeding carrier volume thresholds. For instance, FedEx imposes additional handling fees on packages over 10,368 cubic inches. To streamline packing, create a "do not exceed" list of carton and insert combinations for your high-volume SKUs. A snug fit not only reduces the risk of damage but also enhances the unboxing experience for your customers.
Use Technology to Improve Packaging Efficiency
Box Optimization Software
Manually picking boxes for shipments often results in wasted space and higher DIM (dimensional weight) charges. That’s where box optimization software steps in. Using 3D bin packing algorithms, this technology analyzes product dimensions and selects the smallest box that fits each order. This automation not only saves time but also cuts down on shipping costs by 10–15% while keeping packages within carrier volume limits.
Take platforms like Navexa, for instance. Their software ensures your packages stay under thresholds that trigger extra fees. For example, FedEx applies Additional Handling fees for packages over 10,368 cubic inches and Oversize surcharges at 17,280 cubic inches. Staying below these limits can save you several dollars per shipment.
"Navexa cut our shipping costs by 12% in the first month. The box optimization alone paid for the entire platform." - Sarah Chen, Head of Operations, Bloom & Wild
What’s more, advanced cartonization logic goes beyond simple dimensions. It factors in item shape, fragility, and even multi-pack requirements. Fragile items get special handling, while soft goods are packed differently - all without manual adjustments. Navexa even offers a 14-day free trial (no credit card needed), so you can see the impact for yourself.
While automated box selection reduces costs, keeping an eye on performance ensures those savings stick around.
Track Performance with Analytics
Technology doesn’t just streamline box selection - it also helps you fine-tune your entire packaging strategy. Analytics turn packaging into a measurable, strategic advantage. For example, tracking metrics like cubic inches shipped per order can reveal when efficiency starts to slip. A detailed cost-per-order breakdown highlights exactly how much each SKU costs to ship, factoring in materials and labor.
Modern analytics platforms sync seamlessly with tools like Shopify and Amazon, pulling in dimensions and shipping data automatically. No more manual data entry. Alerts for missing product dimensions prevent delays, while visual dashboards and heat maps make patterns easy to spot. If certain SKUs consistently require oversized boxes or too much void fill, you can address those issues head-on.
Conclusion
This guide has outlined how well-matched packaging dimensions can cut wasted space and lower shipping costs. Right-sizing isn’t just about smaller boxes - it’s about saving money, speeding up fulfillment, and meeting customer expectations. By reducing wasted space, you sidestep dimensional weight fees, which can add anywhere from $0.50 to $2.00 per shipment. Plus, using less void fill lowers material costs, and a streamlined packing process gets orders out the door faster.
The financial benefits are clear. Right-sizing can reduce shipping costs by 15–30% and improve margins by 3% in just 90 days. For instance, a supplement brand shipping 8,000 orders per month saved $177,000 annually by shifting from a one-size-fits-all method to a three-box system. That’s money that can be reinvested to grow your business.
To take these savings even further, technology can automate the process. Tools like Navexa optimize box selection and compare carrier rates automatically, cutting shipping costs by 10–15% while ensuring packages stay within carrier thresholds that could trigger extra fees. They even offer a risk-free 14-day trial - no credit card needed.
Start by auditing your shipments and creating a simple box matrix for your top products. A 3–5 size box system can cover 90% of your orders, and automation can handle the rest. Implement these steps now to see immediate monthly savings.
FAQs
How do I calculate DIM weight for my packages?
To figure out DIM weight, take the package's length, width, and height, multiply them together, and divide the result by your carrier's DIM divisor. The formula looks like this:
DIM Weight = (Length x Width x Height) / DIM Divisor
For instance, if a package measures 12 x 8 x 4 inches and the DIM divisor is 139, the calculation would give you a DIM weight of approximately 3.48 pounds. Keep in mind, carriers will bill you based on whichever is higher: the DIM weight or the actual weight.
What box sizes cover most orders without overstocking cartons?
To handle orders effectively, choose box sizes that align closely with your product dimensions while keeping extra space to a minimum. Typical e-commerce box sizes range from 6" x 4" x 1" to 25" on any side, with an allowance of up to 2" of additional space. Selecting appropriately sized boxes helps cut down on material waste, speeds up the packing process, reduces shipping costs, and minimizes the risk of oversized parcel surcharges.
When should I use custom inserts instead of void fill?
Custom inserts are a smart choice when you want to ensure better protection for your products, cut down on shipping expenses, and minimize material waste. These inserts are designed to keep items securely in place, reducing the risk of damage during transit. Plus, they eliminate unnecessary empty space, which can lead to higher dimensional weight charges.
On the other hand, void fill is often used to occupy extra space in oversized boxes. While it can help fill gaps, it doesn’t provide the same level of protection or efficiency that custom inserts offer.
Ship your next order through Navexa.
Connect a store, buy a label, and see the numbers yourself.