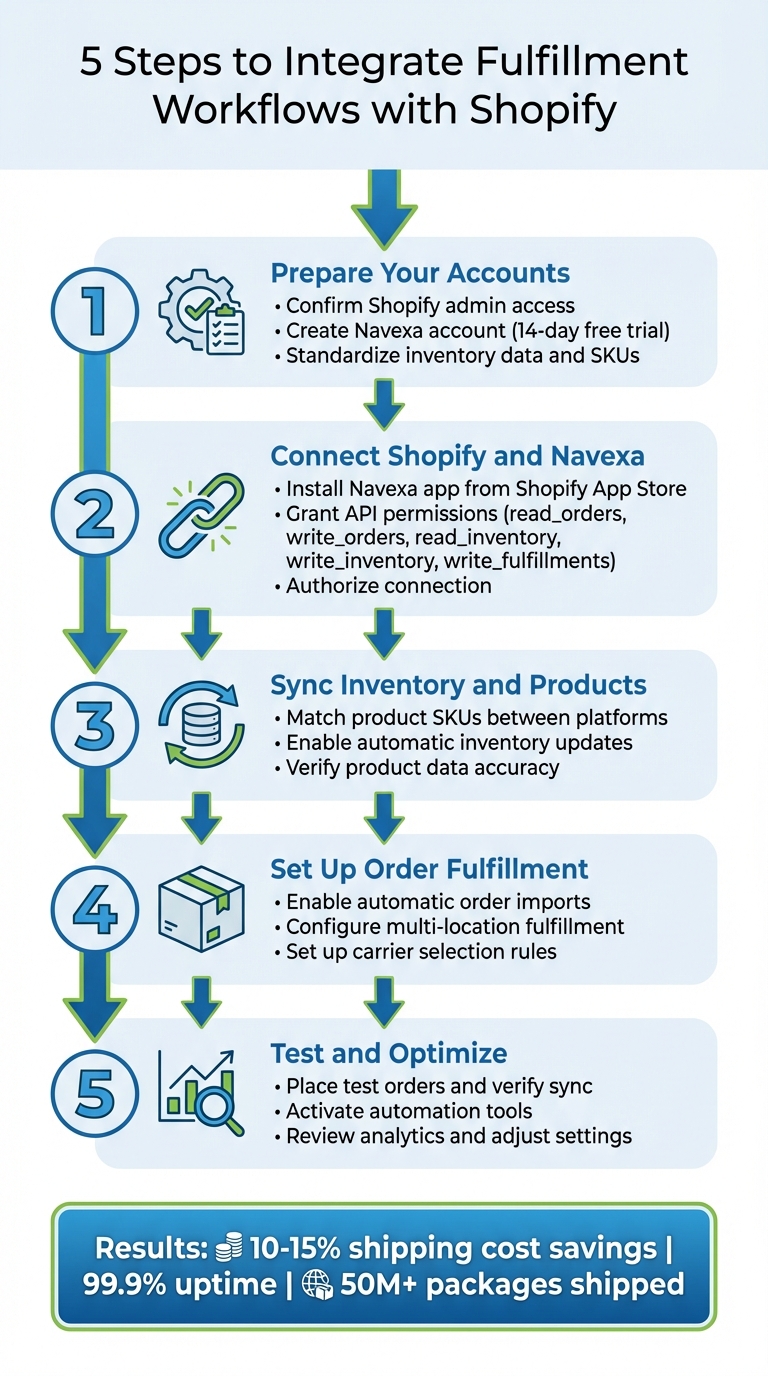
5 Steps to Integrate Fulfillment Workflows with Shopify
Integrating Shopify with a fulfillment platform like Navexa can help you automate key processes, reduce manual errors, and improve order accuracy. This guide breaks it down into five actionable steps:
- Prepare Your Accounts: Ensure you have full Shopify admin access, a Navexa account, and clean inventory data.
- Connect Shopify and Navexa: Install the Navexa app, grant API permissions, and authorize the connection.
- Sync Inventory and Products: Match SKUs, enable automatic updates, and verify product data.
- Set Up Order Fulfillment: Automate order imports, configure multi-location shipping, and optimize carrier selection.
- Test and Optimize: Place test orders, activate automation tools, and review analytics to fine-tune operations.
5 Steps to Integrate Fulfillment Workflows with Shopify
Shopify Integration: How to Automate Order Fulfillment for Merchants

What You Need Before Starting
To successfully integrate Navexa with Shopify, you'll need three things: full Shopify admin access, a Navexa account, and clean inventory data. Missing any of these could lead to sync errors, overselling, or shipping delays. Start by confirming your admin access, setting up your Navexa account, and organizing your inventory for a seamless integration process.
Confirm Your Shopify Admin Access
Make sure you have full admin permissions in Shopify to complete the integration. This includes being able to access "Settings" and "Apps and sales channels" to enable custom app development. From your Shopify admin dashboard, navigate to "Develop apps" and activate custom app development before moving forward.
The integration relies on specific API permissions, known as "scopes", to work effectively. These include:
read_ordersandwrite_orders: For importing orders and updating fulfillment statuses.read_inventoryandwrite_inventory: To synchronize stock levels between Navexa and Shopify.write_fulfillments: For creating fulfillment records and adding tracking details.read_assigned_fulfillment_orders: To receive and process fulfillment requests.read_products: For matching SKUs and product details across platforms.
Once permissions are granted, Shopify generates an Admin API access token - make sure to save it immediately. This token is displayed only once and remains valid until the app is uninstalled.
| Required Permission | Purpose |
|---|---|
read_orders / write_orders |
Import orders and update fulfillment status |
read_inventory / write_inventory |
Sync stock levels between Navexa and Shopify |
write_fulfillments |
Create fulfillment records and add tracking numbers |
read_assigned_fulfillment_orders |
Receive and act on fulfillment requests |
read_products |
Match SKUs and product details across platforms |
Create Your Navexa Account
After confirming your Shopify admin access, sign up for Navexa. They offer a 14-day free trial with no credit card required. You can choose between the Standard Plan (great for small businesses focused on fulfillment) or the Enterprise Plan (designed for high-volume shippers needing advanced analytics and custom API access). Navexa currently supports over 2,500 active brands and has handled more than 50 million packages with 99.9% uptime.
Review and Standardize Your Inventory
Before syncing, ensure your inventory is well-organized. Each Shopify variant needs to be mapped to a unique identifier, such as an SKU or barcode, in Navexa. If not, you'll risk what experts refer to as "inventory black holes", where stock goes untracked.
Unmapped variants are inventory black holes
- David Vance, September 2025.
For products with variants, use a consistent SKU format. For instance, you might combine a base item number with a variant code, separated by an underscore (e.g., ITEM123_RED). Audit your Shopify catalog thoroughly and map any unmapped variants before launching the sync. A clean inventory setup is crucial for smooth order fulfillment, as outlined in the next steps.
Step 1: Set Up Your Navexa Account
After organizing your Shopify inventory, it's time to configure your Navexa account for efficient management.
Register for Navexa and Choose a Plan
Head over to Navexa and sign up for their 14-day free trial - no credit card required. During the setup, make sure to select the correct currency (USD or AUD) to avoid any billing issues.
Once you're registered, choose the plan that fits your business needs. The Standard Plan works well for small businesses looking for streamlined operations, while the Enterprise Plan is better suited for high-volume shippers who need custom API access and advanced analytics.
"Navexa cut our shipping costs by 12% in the first month. The box optimization alone paid for the entire platform."
- Sarah Chen, Head of Operations at Bloom & Wild
Upload Your Products and Set Inventory Levels
Prepare your product catalog by compiling key details - like SKUs, barcodes, weights, and dimensions (length, width, height) - into a CSV file for bulk importing. If your business involves international shipping, make sure to include HS codes and Country of Origin information to stay compliant with customs regulations.
Next, set your initial inventory levels and activate automated reorder point alerts. Navexa's demand forecasting tools can help you avoid stockouts and keep your inventory running smoothly.
"The inventory forecasting feature helped us reduce stockouts by 40%. Our customers are happier than ever."
- Emily Watson, Founder & CEO of Glow Recipe
To ensure smooth fulfillment, Navexa will flag any products missing dimensions. Be sure to review and address these alerts promptly.
Step 2: Connect Navexa to Shopify
Now that your Navexa account is set up, it’s time to link it with your Shopify store. This integration ensures a smooth flow of data - order details move to Navexa, while tracking updates are sent back to Shopify in real time.
Install the Navexa App from the Shopify App Store
Start by searching for "Navexa" in the Shopify App Store. Navexa provides a ready-to-use integration that allows you to connect the platforms in just a few minutes [17, 20]. Click Install to get started.
During the installation process, Shopify will ask you to review the permissions required by the app. These permissions allow access to view and edit your Products, Inventory, and Orders. Additionally, the app needs Admin API permissions like write_fulfillments, read_fulfillments, write_assigned_fulfillment_orders, and read_assigned_fulfillment_orders to manage your fulfillment tasks effectively.
Once you’ve reviewed everything, proceed to authorize the connection.
Authorize the Connection
After reviewing the permissions, click "Install app" to securely grant access. This step activates the automatic syncing of order details, inventory levels, and tracking updates [21, 24].
When the authorization process is complete, the connection is instantly established, and Navexa will appear in your Shopify admin dashboard. From here, the integration is ready to manage your fulfillment operations reliably and efficiently.
sbb-itb-ed0a9d1
Step 3: Sync Products and Inventory
Connecting product data between Shopify and Navexa is crucial to ensure SKUs align, inventory updates automatically, and product details stay consistent across both platforms.
Match Product SKUs Between Platforms
For integration to work smoothly, your SKUs must follow a precise format. If a product doesn’t have variants, its Shopify SKU must exactly match the Navexa item number. For products with variants, the SKU should combine the base item number with the variant code, separated by an underscore (e.g., 8000_1).
Always map products using SKU strings or barcodes instead of product titles or variant names, as these can change over time. Once the connection is set, Navexa saves Shopify’s internal Product ID and Variant ID, ensuring the link remains stable even if the SKU string changes later.
Turn On Automatic Inventory Updates
Go to your Navexa Shopify store settings and enable "Send Inventory Updates" to push inventory levels to Shopify automatically. For each product, activate the "Shopify Item" toggle on the Item Card to include it in the sync. Map each Navexa location to its corresponding Shopify location ID to ensure stock levels update in the correct location.
Use Navexa as your main source for inventory counts. Avoid making manual changes directly in Shopify, as these adjustments won’t sync back to your fulfillment system. While updates occur in real time, there might be a one-minute delay as changes process through the job queue.
Once this is set up, double-check that all product data is syncing correctly.
Check Product Data for Accuracy
After syncing, confirm that the Navexa Item Card displays Shopify Product, Variant, and Inventory Item IDs. Ensure the "Synchronization Enabled" toggle is active - this shows that the item has been successfully created in your Shopify store.
Check the NaviConnect Task List to confirm that Shopify is accepting item and inventory updates. Perform audits every four hours by comparing inventory levels between platforms to catch any inconsistencies. You can also use the "Shopify Inventory Levels" section in Navexa to view available inventory before it’s sent to Shopify. Keep monitoring the sync status regularly to ensure everything runs smoothly.
Step 4: Set Up Order Routing and Fulfillment
Once your products and inventory are synced, the next step is setting up order routing and fulfillment. This ensures a smooth process from order placement to delivery.
Enable Automatic Order Imports
Head to Settings > Checkout > Order processing in your Shopify admin. Here, select "Automatically fulfill the order's line items" to send orders directly to Navexa once payment is cleared. This automation saves time by eliminating manual data entry and kickstarts order processing immediately.
Navexa's one-click integration makes syncing orders seamless. After connecting, the system automates key tasks like selecting carriers, printing shipping labels, and sending tracking updates to customers.
You’ll also want to configure multi-location fulfillment to optimize shipping efficiency.
Configure Multi-Location Fulfillment
For businesses shipping from multiple warehouses, go to Settings > Shipping and delivery > Order routing in Shopify. Arrange your locations by dragging your primary distribution center to the top, ensuring it handles most orders.
Shopify’s routing rules can help streamline the process. Use the "Minimize split fulfillments" rule to prioritize locations that can ship entire orders in a single package, cutting down on shipping costs and packaging waste. Add the "Ship from closest location" rule to select the nearest warehouse based on geographic proximity, reducing delivery times. Place this rule lower in the list to serve as a tie-breaker when necessary.
For warehouses not handling online orders, navigate to Settings > Locations, select the specific location, and toggle off "Use inventory at this location to fulfill online orders". Within Navexa, you can also enable intelligent box optimization to lower dimensional weight fees and ensure the system chooses the most cost-effective shipping option every time.
Step 5: Test and Optimize Your Integration
Finalizing your integrated fulfillment workflow involves thorough testing and adjustments to ensure everything runs smoothly, from order placement to delivery. Testing your setup before handling real orders helps catch any issues early and fine-tune operations for better efficiency.
Place Test Orders and Verify Sync
Start by enabling Test Mode in your Shopify admin under Settings > Payments. This feature lets you simulate transactions without processing actual payments. Use Shopify's Bogus Gateway to test different scenarios by entering specific numbers: "1" for a successful transaction, "2" for a failed one, and "3" for an exception.
Create a low-cost test product to avoid impacting your live inventory. Place a test order as if you were a customer. After processing the order, check that Navexa generates a fulfillment request in its task list. In Shopify, review the order timeline to confirm updates like "Accepted" or "Declined" appear correctly.
"Knowing if something is broken immediately is priceless." - Michael Jankie, Founder of Natural Patch
Regular testing can save you from costly errors.
"If you're running ads and your site goes down, you're literally burning money. Happened to us twice last year, and each time we burned several thousand dollars because it took us hours to realize that our site was broken." - Mehul Patel, Founder of Uproot Clean
Once you're confident in your test transactions, move forward with automating and optimizing your processes.
Set Up Navexa's Automation Tools
After confirming your integration works, activate Navexa's automation tools to streamline your operations. Enable multi-carrier rate shopping to automatically compare shipping rates among USPS, FedEx, UPS, and DHL for every package. Use intelligent box optimization, which applies 3D bin packing algorithms to choose the most cost-efficient box size, reducing dimensional weight charges.
Turn on inventory forecasting to automate reorder points and prevent stockouts. Set up rule-based workflows to handle tasks like auto-assigning carriers, bulk printing labels, and sending customers real-time tracking updates. Start with simple automation rules to make troubleshooting easier. Use order tags like "high-value" or "manual-review" to create clear audit trails for automated actions.
"Navexa cut our shipping costs by 12% in the first month. The box optimization alone paid for the entire platform." - Sarah Chen, Head of Operations at Bloom & Wild
"The inventory forecasting feature helped us reduce stockouts by 40%. Our customers are happier than ever." - Emily Watson, Founder & CEO of Glow Recipe
Review Analytics and Adjust Settings
With automation tools in place, closely monitor analytics to identify areas for improvement. Navexa's dashboard offers insights into shipping costs, carrier performance, and inventory health. Use shipping cost analytics to break down costs per order and track historical savings. Evaluate carrier performance metrics to assess delivery times and reliability. Keep an eye on inventory data, such as consumption rates and stockout predictions.
Set a schedule for reviewing analytics based on the nature of each metric. For example, check order metrics daily or weekly to catch issues quickly. Conduct monthly reviews of shipping times, costs, and carrier performance to identify patterns. Quarterly audits can help determine whether your carrier partners are meeting long-term goals.
"We ship 10,000+ orders daily, and Navexa handles it flawlessly. The multi-carrier rate shopping is a game-changer." - Marcus Rodriguez, VP of Logistics at Urban Outfitters
Update your automation rules at least every quarter to account for changes like carrier rate adjustments, seasonal demand, or new product launches. Regularly refining your setup ensures it continues to meet your business needs effectively.
Conclusion
Integrating Navexa with Shopify can revolutionize your fulfillment process by automating tedious tasks and cutting down on shipping expenses. By following five straightforward steps - setting up your account, linking the platforms, syncing inventory, configuring order routing, and testing the integration - you can build a system that handles everything from selecting carriers to updating tracking information without manual effort.
Navexa users typically save 10–15% on shipping costs, thanks to tools like multi-carrier rate shopping and advanced 3D bin packing algorithms, which help lower dimensional weight fees. With over 50 million packages shipped by more than 2,500 brands, Navexa has demonstrated its ability to scale effectively.
Automation doesn’t just save money; it also eliminates repetitive tasks like manual data entry and order processing, freeing your team to focus on growing the business. With 99.9% uptime, Navexa ensures reliable fulfillment operations even during busy periods.
Inventory management becomes more efficient with algorithm-driven forecasting, which helps avoid stockouts and reduces surplus inventory. Real-time synchronization between Shopify and Navexa keeps product data, SKUs, and stock levels accurate, reducing the risk of overselling and disappointing customers. For international shipping, automated customs documentation and duties calculation simplify the process even further.
Get started with Navexa’s 14-day free trial to see these advantages for yourself. As your business grows, Navexa’s automated workflows are built to scale effortlessly - handling over 10,000 orders daily without needing extra staff.
(All statistics and data are sourced from.)
FAQs
What should I do if my SKUs don’t match between Shopify and Navexa?
If the SKUs between Shopify and Navexa don’t align, it’s crucial to synchronize your item data properly. Start by linking Business Central locations to their corresponding Shopify locations and ensure your SKUs are mapped correctly. To confirm items are synced, go to Navexa’s integration setup, select the relevant items, and activate the Shopify item toggle for each one. This setup helps maintain accurate inventory records across both platforms.
How do I prevent overselling after turning on inventory sync?
To avoid overselling, it's crucial to keep your inventory updated across all sales channels. Start by enabling near real-time inventory sync - this ensures stock levels are accurate no matter where items are sold.
Another smart move is setting up safety stock buffers. These act as a cushion for unexpected demand spikes, giving you a little extra breathing room. Also, make sure to disable the "continue selling when out of stock" option in your Shopify settings.
By following these steps, you can maintain better control over your inventory and minimize the chances of selling products you don't actually have, especially during those busy, high-demand periods.
What’s the best way to test the integration without affecting real orders?
To ensure your Shopify fulfillment workflows run smoothly without affecting actual orders, take advantage of Shopify's test order feature. This tool lets you simulate transactions, making it easy to safely check your checkout, payment, and fulfillment processes. You can either enable test mode in your payment gateway or use Shopify’s built-in testing environment. This approach helps you verify crucial workflows - like order routing and shipping - in a controlled environment before launching your store live.
Ship your next order through Navexa.
Connect a store, buy a label, and see the numbers yourself.